
A cluttered kitchen counter is the enemy of a peaceful morning routine. If your coffee station is overrun by a sprawling collection of ceramic cups, utilizing the dead space beneath your upper cabinets is a brilliant design solution. However, hanging heavy stoneware over hard countertops requires more than just a couple of random screws. If executed poorly, you risk stripping your cabinet wood, piercing the interior shelf of your cabinetry, or waking up to the sound of shattered heirloom mugs on your granite counters.
Learning how to mount an under cabinet coffee mug rack properly ensures your mugs remain safely suspended and your cabinetry stays undamaged. Whether you are working with solid oak, engineered MDF, or rental-friendly surfaces, taking a systematic approach to this quick weekend project will yield professional, secure results. As we look ahead to kitchen design trends in 2026, clean, streamlined countertops paired with smart, integrated storage remain at the forefront of modern home organization.
As an Amazon Associate we earn from qualifying purchases at no extra cost to you. Product prices and availability are accurate as of the date shown and are subject to change.

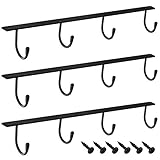
Quick answer: Our top pick in 2026 is the Under-Cabinet Mug Rack — our #1 rated choice. See the full ranked comparison, alternatives and buying advice below.
What You Need
Before you begin, gather your tools and choose the right hardware for your cabinet type. Standard cabinet bottoms are typically 1/2-inch to 3/4-inch thick, which dictates the length of the screws you can safely use.
| Item | Why | Optional? |
|---|---|---|
| Under-Cabinet Mug Rack | The structural frame that holds the hooks. Options range from heavy-duty iron frames (like the MOCOUM 3-pack iron rack, retailing around $15 to $20) to lightweight dual-install options (like the DEPAOTLUX 3-piece adhesive/screw set, priced around $7 to $10). | No |
| Short Wood Screws | Typically #6 or #8 flathead wood screws (1/2-inch length is standard for most cabinets to prevent puncturing the interior shelf). | No (unless using 100% adhesive on light mugs) |
| Drill & Small Drill Bit | A 1/16-inch or 3/32-inch bit to drill pilot holes, preventing the cabinet wood from splitting. | Highly Recommended |
| Painter’s Tape | Used to temporarily hold the rack in place for marking holes and to act as a drill depth stop. | Yes |
| Hand Screwdriver | For the final tightening of screws to avoid stripping the pre-drilled holes. | No |
| Measuring Tape & Pencil | To ensure the rack is centered and positioned far enough from the wall for mug clearance. | No |
Step-by-Step
Mounting your rack should take roughly 20 to 30 minutes. Follow these numbered steps to ensure a flush, level, and secure installation.
Step 1: Measure Your Cabinet Bottom and Mug Clearance (Time: 5 Minutes)
Open your cabinet and measure the thickness of the bottom shelf. Most face-frame cabinets have a recessed bottom lip, meaning the actual shelf board is thinner than the front trim. Measure the flat portion where the rack will sit. Next, grab your largest coffee mug. Measure its diameter and height. You must mount the rack far enough away from the back wall (usually 3.5 to 4.5 inches) so the mugs do not rest awkwardly against your backsplash or tile.
Step 2: Position and Mark the Holes (Time: 5 Minutes)
Hold your mug rack against the underside of the cabinet in your desired location. Ensure it is perfectly parallel to the front of the cabinet. Use a strip of painter’s tape to temporarily hold the rack in place. Take a pencil and mark the exact center of each screw hole onto the cabinet wood. Remove the rack and double-check your markings with a ruler to ensure they are straight.
Step 3: Set Your Drill Depth and Drill Pilot Holes (Time: 5 Minutes)
To avoid drilling all the way through into your cabinet interior, place your screw next to your drill bit. Wrap a piece of painter’s tape around the drill bit to mark the exact length of the screw threads. This “tape flag” serves as a visual depth stop. Align your drill with your pencil marks and drill pilot holes slowly, stopping the moment your tape flag meets the wood surface. Pre-drilling is essential; skipping this step can split hardwood or crumble MDF cabinetry.
Step 4: Mount the Rack and Secure the Screws (Time: 10 Minutes)
Align the mug rack with your newly drilled pilot holes. If you are using a hybrid model like the DEPAOTLUX rack, you can apply the included adhesive backing first to hold the unit perfectly flush while you work. Insert your screws into the pilot holes. Use a manual handheld screwdriver rather than a power drill for this step. Power drills can easily over-torque small screws, stripping the threads in the wood and ruining the hold. Tighten until the screw head is flush with the metal bracket, but do not over-tighten.
Step 5: Load Test and Check Clearance (Time: 3 Minutes)
Once the rack is secure, gently hang your heaviest mugs one by one. Check to see if the metal hooks flex under the weight. Standard screw-mounted iron racks, like the MOCOUM iron hanging holder, can easily support 10 to 15 pounds of weight when properly screwed into solid wood. Ensure the mugs hang freely without banging against each other or the wall behind them.
Mistakes to Avoid
- Using Screws That Are Too Long: This is the most common DIY disaster. Standard wood screws included in cheap kits are often 3/4-inch or 1-inch long. If your cabinet floor is only 1/2-inch thick, these will pierce through to the inside, leaving sharp metal points that can scratch your dinnerware or hands. Always measure and purchase shorter 1/2-inch screws if necessary.
- Relying Solely on Adhesive for Heavy Ceramics: While adhesive strips are convenient, steam from dishwashers, kettles, and coffee makers will degrade the glue over time. Heavy ceramic, stoneware, or glass mugs (weighing 12 to 18 ounces each) should only be hung from screw-mounted racks. Reserve adhesive-only mounting for lightweight metal travel cups or melamine mugs.
- Forgetting Backsplash Clearance: If you mount the rack too close to the wall, your mugs will hang at an angle, putting uneven stress on the hooks and scratching your tile backsplash. Always measure your widest mug and divide that number in half to find the absolute minimum distance your rack must sit from the wall.
- Over-tightening Screws in MDF: Medium-density fiberboard (MDF) cabinets do not hold screws as tenaciously as solid wood. If you over-tighten a screw in MDF, the wood fibers will strip out, leaving a loose hole that cannot support weight. Turn the screwdriver slowly and stop the moment you feel firm resistance.
How Often
An under-cabinet mug rack requires very little maintenance, but a quick routine check ensures long-term safety:
- Every 6 Months: Give the rack a gentle wiggle test. If there is any play or looseness, use a hand screwdriver to tighten the mounting screws. Over time, the daily action of pulling mugs off the hooks can slowly loosen the hardware.
- Every 2 Months: Wipe down the rack with a damp microfiber cloth. Kitchen grease and steam from your coffee maker can accumulate on the hooks, attracting dust and compromising the finish.
- Annually (for Adhesive Mounts): If you chose a drill-free adhesive install, inspect the edges of the adhesive pads annually. If you notice any peeling, lifting, or discoloration from kitchen moisture, remove the rack, clean the cabinet surface with rubbing alcohol, and apply fresh, heavy-duty mounting tape.
When to Call a Pro or Replace
While this is a straightforward DIY project, certain situations warrant calling in a professional handyman or replacing your setup entirely. If your cabinets are high-end, custom-built units with integrated glass bottoms or under-cabinet puck lighting, routing wires may run directly through the bottom panel. Drilling blindly into these panels could sever electrical lines or shatter glass. A professional can safely navigate these obstacles.
You should replace your mug rack immediately if you notice the metal hooks bending or sagging. Iron racks that have sustained water damage or rust should also be replaced to prevent staining your mugs. If the wood beneath your cabinet has stripped out completely, do not attempt to re-drill in the same spot. Either relocate the rack slightly or patch the stripped holes with a high-quality wood epoxy before attempting to remount.
FAQ
Can I install an under-cabinet mug rack if I rent my apartment?
Yes, you can use high-quality adhesive-only racks designed for damage-free removal. However, you must strictly limit the weight. Limit your display to lightweight metal camping mugs, plastic cups, or tea strainers, keeping the total weight under 5 pounds to prevent the adhesive from failing unexpectedly.
What should I do if my cabinet bottom is too thin for screws?
If your cabinet bottom is less than 1/2-inch thick, you can glue and clamp a small “backer board” of 1/2-inch plywood to the underside of the cabinet first. Once the wood glue dries, you can screw your mug rack directly into this reinforced backer board without penetrating your cabinet interior.
Are slide-on under-cabinet mug holders safe?
Slide-on holders clip over the bottom shelf of your cabinet without screws. While they are incredibly easy to install, they can scratch your cabinet finish and cause the cabinet door above to sit slightly ajar. They are best suited for open shelving units rather than closed-door cabinetry.
How many mugs can a standard under-cabinet rack hold?
A standard 3-hook or 6-hook rack is designed to hold typical 8-ounce to 12-ounce ceramic cups. If you collect large, heavy 16-ounce stoneware mugs, space them out by skipping every other hook. This prevents the mugs from clattering against each other and keeps the weight distribution even across the cabinet board.
Ready to decide? Our #1 pick for 2026 is the Under-Cabinet Mug Rack.
Live price & availability on Amazon.




Write Your Review
No reviews yet. Be the first to share your experience!